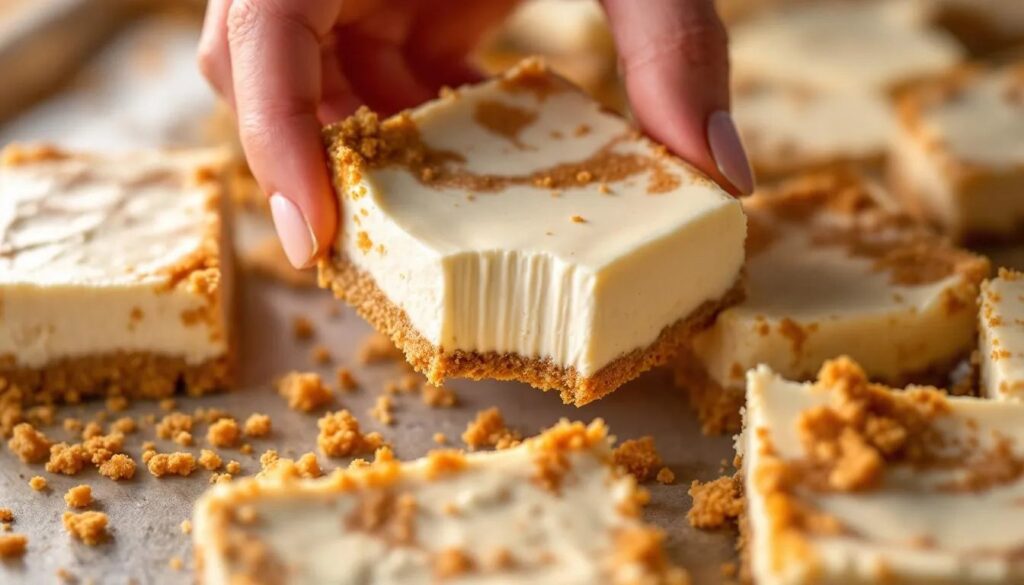
Spring potluck season arrives with a particular kind of pressure: you want to bring something that looks impressive, travels well, and disappears from the table within minutes. These three-ingredient no-bake cheesecake bars answer all three demands without turning your kitchen into a disaster zone. No oven, no water bath, no cracked surface to explain away — just a creamy, set filling on a buttery crust that holds its shape when sliced and delivers that dense, tangy richness that makes cheesecake worth making in the first place. March is the sweet spot for this kind of dessert: the first strawberries are starting to show at farm stands, the weather is warm enough to want something cool, and nobody has yet grown tired of seeing cream cheese on a dessert table.
The three-ingredient formula sounds like a shortcut, but it is closer to a discipline — every component has to work harder when there is nothing to hide behind. This recipe uses full-fat cream cheese, sweetened condensed milk, and fresh lemon juice as the filling, poured over a simple graham cracker crust that you press into the pan and chill. What happens in the refrigerator is essentially an acid-set: the lemon juice interacts with the proteins in the cream cheese, tightening the mixture into something firm enough to slice cleanly but still yielding under a fork. Understanding that mechanism means you can adjust the texture with confidence. Grab a square baking pan and make room in the refrigerator.
| Preparation | 15 min |
| Rest | 4 hours (minimum, overnight preferred) |
| Portions | 12 bars |
| Difficulty | Easy |
| Cost | $ |
| Season | Spring — pairs well with first strawberries, rhubarb, Meyer lemon |
Suitable for: Vegetarian
Ingredients
For the crust
- 200 g graham crackers (roughly 14 full sheets), finely crushed
- 85 g unsalted butter, melted
- 2 tablespoons granulated sugar
For the filling
- 680 g (3 blocks, 8 oz each) full-fat cream cheese, at room temperature
- 1 can (397 g / 14 oz) sweetened condensed milk
- 80 ml (⅓ cup) fresh lemon juice (from approximately 2 large lemons)
Equipment
- 9 × 13 inch (23 × 33 cm) baking pan
- Parchment paper
- Food processor or zip-lock bag and rolling pin
- Stand mixer or hand mixer with beater attachments
- Rubber spatula
- Offset spatula or the back of a large spoon
- Sharp knife and cutting board
Preparation
1. Prepare the pan and crush the crackers
Line the baking pan with two overlapping sheets of parchment paper, leaving a generous overhang on all four sides. These overhangs are your handles — they will let you lift the entire slab out of the pan cleanly before slicing, which is what gives you sharp, bakery-clean edges on the finished bars. Crush the graham crackers in a food processor until the texture resembles coarse sand with no visible chunks remaining. If you do not have a processor, place the crackers in a sealed zip-lock bag and work over them with a rolling pin, applying even pressure across the surface. Uneven crumbs lead to a crust with weak spots that crumble when cut, so take the extra two minutes to get a consistent grind. Transfer the crumbs to a medium bowl.
2. Make and press the crust
Pour the melted butter over the crumbs, add the sugar, and stir until every crumb is coated and the mixture holds its shape when pressed between two fingers — it should feel like damp sand, not wet paste. Tip the mixture into the lined pan and distribute it roughly with your hands before pressing it into an even, compact layer with the flat bottom of a measuring cup or drinking glass. Work from the center outward, pressing firmly so the crust is dense enough to hold together once cold. Pay particular attention to the corners and edges, which have a tendency to stay loose if neglected. Slide the pan into the refrigerator while you make the filling — the cold helps the butter begin to set and keeps the crust from shifting when you pour the filling over it.
3. Beat the cream cheese until perfectly smooth
This step determines the texture of the entire bar, and it cannot be rushed. The cream cheese must be genuinely at room temperature — cold cream cheese will leave small lumps suspended in the filling that no amount of additional mixing will resolve. Cut each block into eight pieces and beat on medium speed for a full 3 to 4 minutes, scraping down the bowl and the beaters at least twice. The target is a texture described as lissé in professional kitchens: completely homogenous, glossy, and almost satin-like when you drag a spatula through it. Hold it up to the light — if you see any granules or rough patches, keep beating. Stopping too early is the most common mistake with no-bake cheesecake.
4. Add the condensed milk and lemon juice
With the mixer running on low, pour the sweetened condensed milk in a slow, steady stream, allowing it to incorporate fully before you increase the speed to medium. Beat for another 2 minutes until the mixture is uniformly pale and fluffy. Now add the fresh lemon juice — and it must be fresh, not bottled. The volatile citrus oils in freshly squeezed juice contribute an aromatic brightness that bottled concentrate cannot replicate, and the acidity level is more predictable. Pour it in slowly, again with the mixer on low, then raise the speed and beat for 1 minute more. You will notice the filling thickening almost immediately as the acid begins to set the proteins — this is exactly what you want. The finished batter should fall off the spatula in slow, thick ribbons.
5. Pour, smooth, and chill
Retrieve the crust from the refrigerator and pour the filling over it in one motion, starting from the center of the pan. Use an offset spatula — or the back of a large metal spoon — to spread it to the edges in long, sweeping strokes, working quickly so the surface stays level before the filling begins to set. Tap the pan firmly on the counter three or four times to release any air bubbles trapped beneath the surface. Cover tightly with plastic wrap, pressing it directly against the surface of the filling to prevent a skin from forming, then refrigerate for a minimum of 4 hours. Overnight is better. The bars will not slice cleanly if any warmth remains in the center.
6. Unmold and slice
Use the parchment overhang to lift the entire slab onto a cutting board. Peel back the paper on all sides. For clean cuts, run a sharp, thin-bladed knife under hot water, wipe it dry, and make each slice in one confident downward motion — do not saw. Clean and rewarm the blade between every cut. Slice into twelve bars of roughly equal size, or cut smaller squares if the potluck crowd is large. Transfer to a serving platter or back into the pan for transport.
My chef's tip
The single most impactful upgrade you can make to this recipe is to brown the butter before mixing it into the crumbs. Melt the butter over medium heat in a light-colored saucepan, swirling gently, until the foam subsides and the milk solids at the bottom turn the color of a hazelnut shell — about 5 minutes. The nutty, caramel-like aroma that develops adds an entire layer of complexity to what is otherwise a plain crust. Let it cool to room temperature before mixing so it does not begin to melt the fat in the cream cheese when the filling is poured over. In spring, consider pressing a single layer of very thin strawberry slices into the top of the filling before it fully sets — arrange them at the 3-hour mark, press gently, and return the pan to the refrigerator for the final chill.
Pairing suggestions
The filling is tangy and rich with a clean dairy finish — the pairing goal is something that either cuts through that richness with acidity or complements it with floral sweetness. A heavy, oaky wine would overwhelm the delicate lemon note entirely.
A late-harvest Riesling from the Finger Lakes or Alsace brings honeyed stone-fruit aromas and enough residual acidity to keep the pairing lively rather than cloying. For a lighter option, a Moscato d'Asti — slightly fizzy, low in alcohol, fragrant with peach and orange blossom — works particularly well at a warm spring gathering. For a non-alcoholic pairing, a cold-brewed hibiscus tea sweetened lightly with honey, or a sparkling water with a slice of cucumber and fresh mint, both clean the palate effectively between bites.
Background on no-bake cheesecake
No-bake cheesecake exists in some form across nearly every country where cream cheese or quark-style fresh dairy is produced. The American version crystallized during the mid-twentieth century when sweetened condensed milk — initially a wartime pantry staple — became a home-baker's shortcut, eliminating both the need for a custard base and the technical difficulty of a baked cheesecake's water bath. The acid-set method, where citrus juice causes the proteins in the cream cheese to firm without heat, is the same principle used in classic preparations like key lime pie and posset, a British cream dessert that dates to the medieval period.
The no-bake bar format, as opposed to a whole round cheesecake, emerged from American potluck and picnic culture, where portion control, easy transport, and the ability to feed a crowd without a knife and server became practical priorities. Sliced bars travel in a covered container, hold their shape at room temperature for up to two hours, and require no plating theatrics. Regional variations abound: the Pacific Northwest version often incorporates cream from local dairies and a gingersnap crust; in the South, a pecan-praline base is common; and across New England, a swirl of blueberry compote pressed into the filling before chilling has become a warm-weather standard.
Nutrition facts (per bar, approximate values)
| Nutrient | Amount |
|---|---|
| Calories | ~310 kcal |
| Protein | ~6 g |
| Carbohydrates | ~28 g |
| of which sugars | ~22 g |
| Fat | ~19 g |
| Fiber | ~0.5 g |
Frequently asked questions
Can these bars be made ahead of time?
Yes — and they are actually better made the day before. The filling firms more completely with a full overnight chill, and the flavors integrate in a way that a 4-hour set cannot quite achieve. Prepare through the smoothing step, cover tightly, and refrigerate for up to 48 hours before slicing. Wait to cut them until just before serving or transporting.
How should leftovers be stored?
Store sliced bars in an airtight container in the refrigerator for up to 5 days. Place a sheet of parchment between layers if stacking to prevent them from sticking together. These bars can also be frozen: wrap each bar individually in plastic wrap, then place in a freezer-safe container for up to 1 month. Thaw overnight in the refrigerator — do not thaw at room temperature, which causes the filling to weep.
What substitutions or seasonal variations are possible?
The lemon juice can be replaced with an equal amount of lime juice for a sharper, more tropical result, or with Meyer lemon juice — available through late spring — for something gentler and more floral. The graham cracker crust can be swapped for crushed digestive biscuits, vanilla wafers, or gingersnaps without changing any other proportions. For a spring variation, fold 2 tablespoons of finely chopped fresh mint into the filling, or press a thin layer of macerated strawberries into the top of the filling at the 3-hour mark and return to the refrigerator to finish setting.
Why is my filling not firm enough to slice?
The two most common causes are insufficient chilling time and cream cheese that was not fully beaten before the other ingredients were added. If the bars are still soft after 4 hours, give them another 2 hours in the coldest part of your refrigerator — usually the back of the bottom shelf. If the problem recurs, check that your condensed milk can is the sweetened, full-fat variety rather than evaporated milk, which will not set the same way, and that your lemon juice measurement is accurate.
Can this recipe be scaled for a larger crowd?
The recipe scales cleanly. For a full sheet pan (18 × 26 inches / 46 × 66 cm), double all quantities and expect the same chill time. For individual servings, press the crust into the cups of a standard muffin tin lined with paper liners — each cup takes about 1 tablespoon of crust and 3 tablespoons of filling — and chill as directed. Mini cheesecake cups transport particularly well and serve as two-bite portions that disappear quickly at a buffet table.